Saturday, April 8, 2023

April 2023 Card Layout #5

 April 2023 Card Layout #5
SU’s Nature’s Prints Bundle and Sun Prints DSP

A great fun fold for using Stampin’ Up! designer series paper.  Two versions have been included in this post, each one showing one side of the double sided Sun Prints DSP. Plus you can get 3 cards from one sheet of DSP.


Measurements:
  • 4” x 12” double sided paper; 2 1/2” x 6” for envelope flap
  • 4 1/4” x 5 1/2” cardstock for card base
  • 3 3/4” x 5” neutral cardstock for inside
  • Cardstock scraps for stamping and die cutting images.
Directions:
  • Score the double sided paper at 3/4”, 3 1/2”, and 8 3/4”. Fold and glue down the most narrow panel.
  • Adhere the double sided paper to the card base.
  • Stamp and adhere the neutral panel to the inside.
  • Die cut a focal shape (rectangle, circle, square, label).
  • Stamp and die cut images. Adhere to the focal shape.
  • Adhere double sided paper to the envelope flap and trim.
The products used to design this card can be found in my Online Store

Products: For the first version of the card.
  • Nature’s Prints Bundle 158801 
  • Sun Prints DSP 158790 (available until May 1, 2023, until supplies last)
  • Gray Granite cardstock 146983
  • Starry Sky cardstock 159263
  • Basic White cardstock 159276
  • Fern 3D Embossing Folder 158804
  • Starry Sky Classic Stampin’ Pad 159212
  • Basic Stampin’ Emboss Powders 155554
  • Solid Faceted Gems 159189

Thursday, April 6, 2023

April 2023 Card Layout #4

 April 2023 Card Layout #4
SU’s Desert Details Bundle along with Delicate Desert and Dry Brushed Metallic Specialty DSP

Another fun fold today. Great use of DSP.


Measurements:
  • 5 1/2” x 8 1/2” cardstock for base
  • 3 1/4” x 5 1/2” cardstock 
  • DSP 4” X 5 1/4”, 2 1/2” x 5”, 2 1/2” x 6” for envelope flap; scraps for die cuts
  • 4” x 5 1/4” neutral cardstock for inside 
  • Cut two 1” x 5” strips
  • Scraps of cardstock for stamping and die cutting
Directions:
  • Score cardstock for base at 4 1/2”. Fold on score line.
  • Score cardstock at 1/2” at one end. Fold on score line and glue to inside card base to make the flap.
  • Adhere the larger DSP panel to the front of the card base. Adhere the neutral cardstock to the inside of the card base. This will cover up the panel seam somewhat on the inside of card.
  • I die cut two strips of Cajun Craze cardstock. Adhere the smaller DSP panel to the front card flap. Adhere the two Cajun Craze strips, one on either side of this DSP.
  • Stamp and die cut flowers. Die cut the cactus leaves. Adhere to the front card flap with dimensionals.
  • Adhere the DSP to the envelope flap and trim.
SU products used to make this card can be found in my Online Store.

Products:
  • Desert Details Bundle 160532
  • Delicate Desert DSP 160521
  • Dry Brushed Metallic Specialty DSP 160837
  • Gray Granite cardstock 146983
  • Cajun Craze cardstock 119684
  • Basic White cardstock 159276
  • Calypso Coral 122925 and Gray Granite 147118 Classic Stampin’ Pads

Wednesday, April 5, 2023

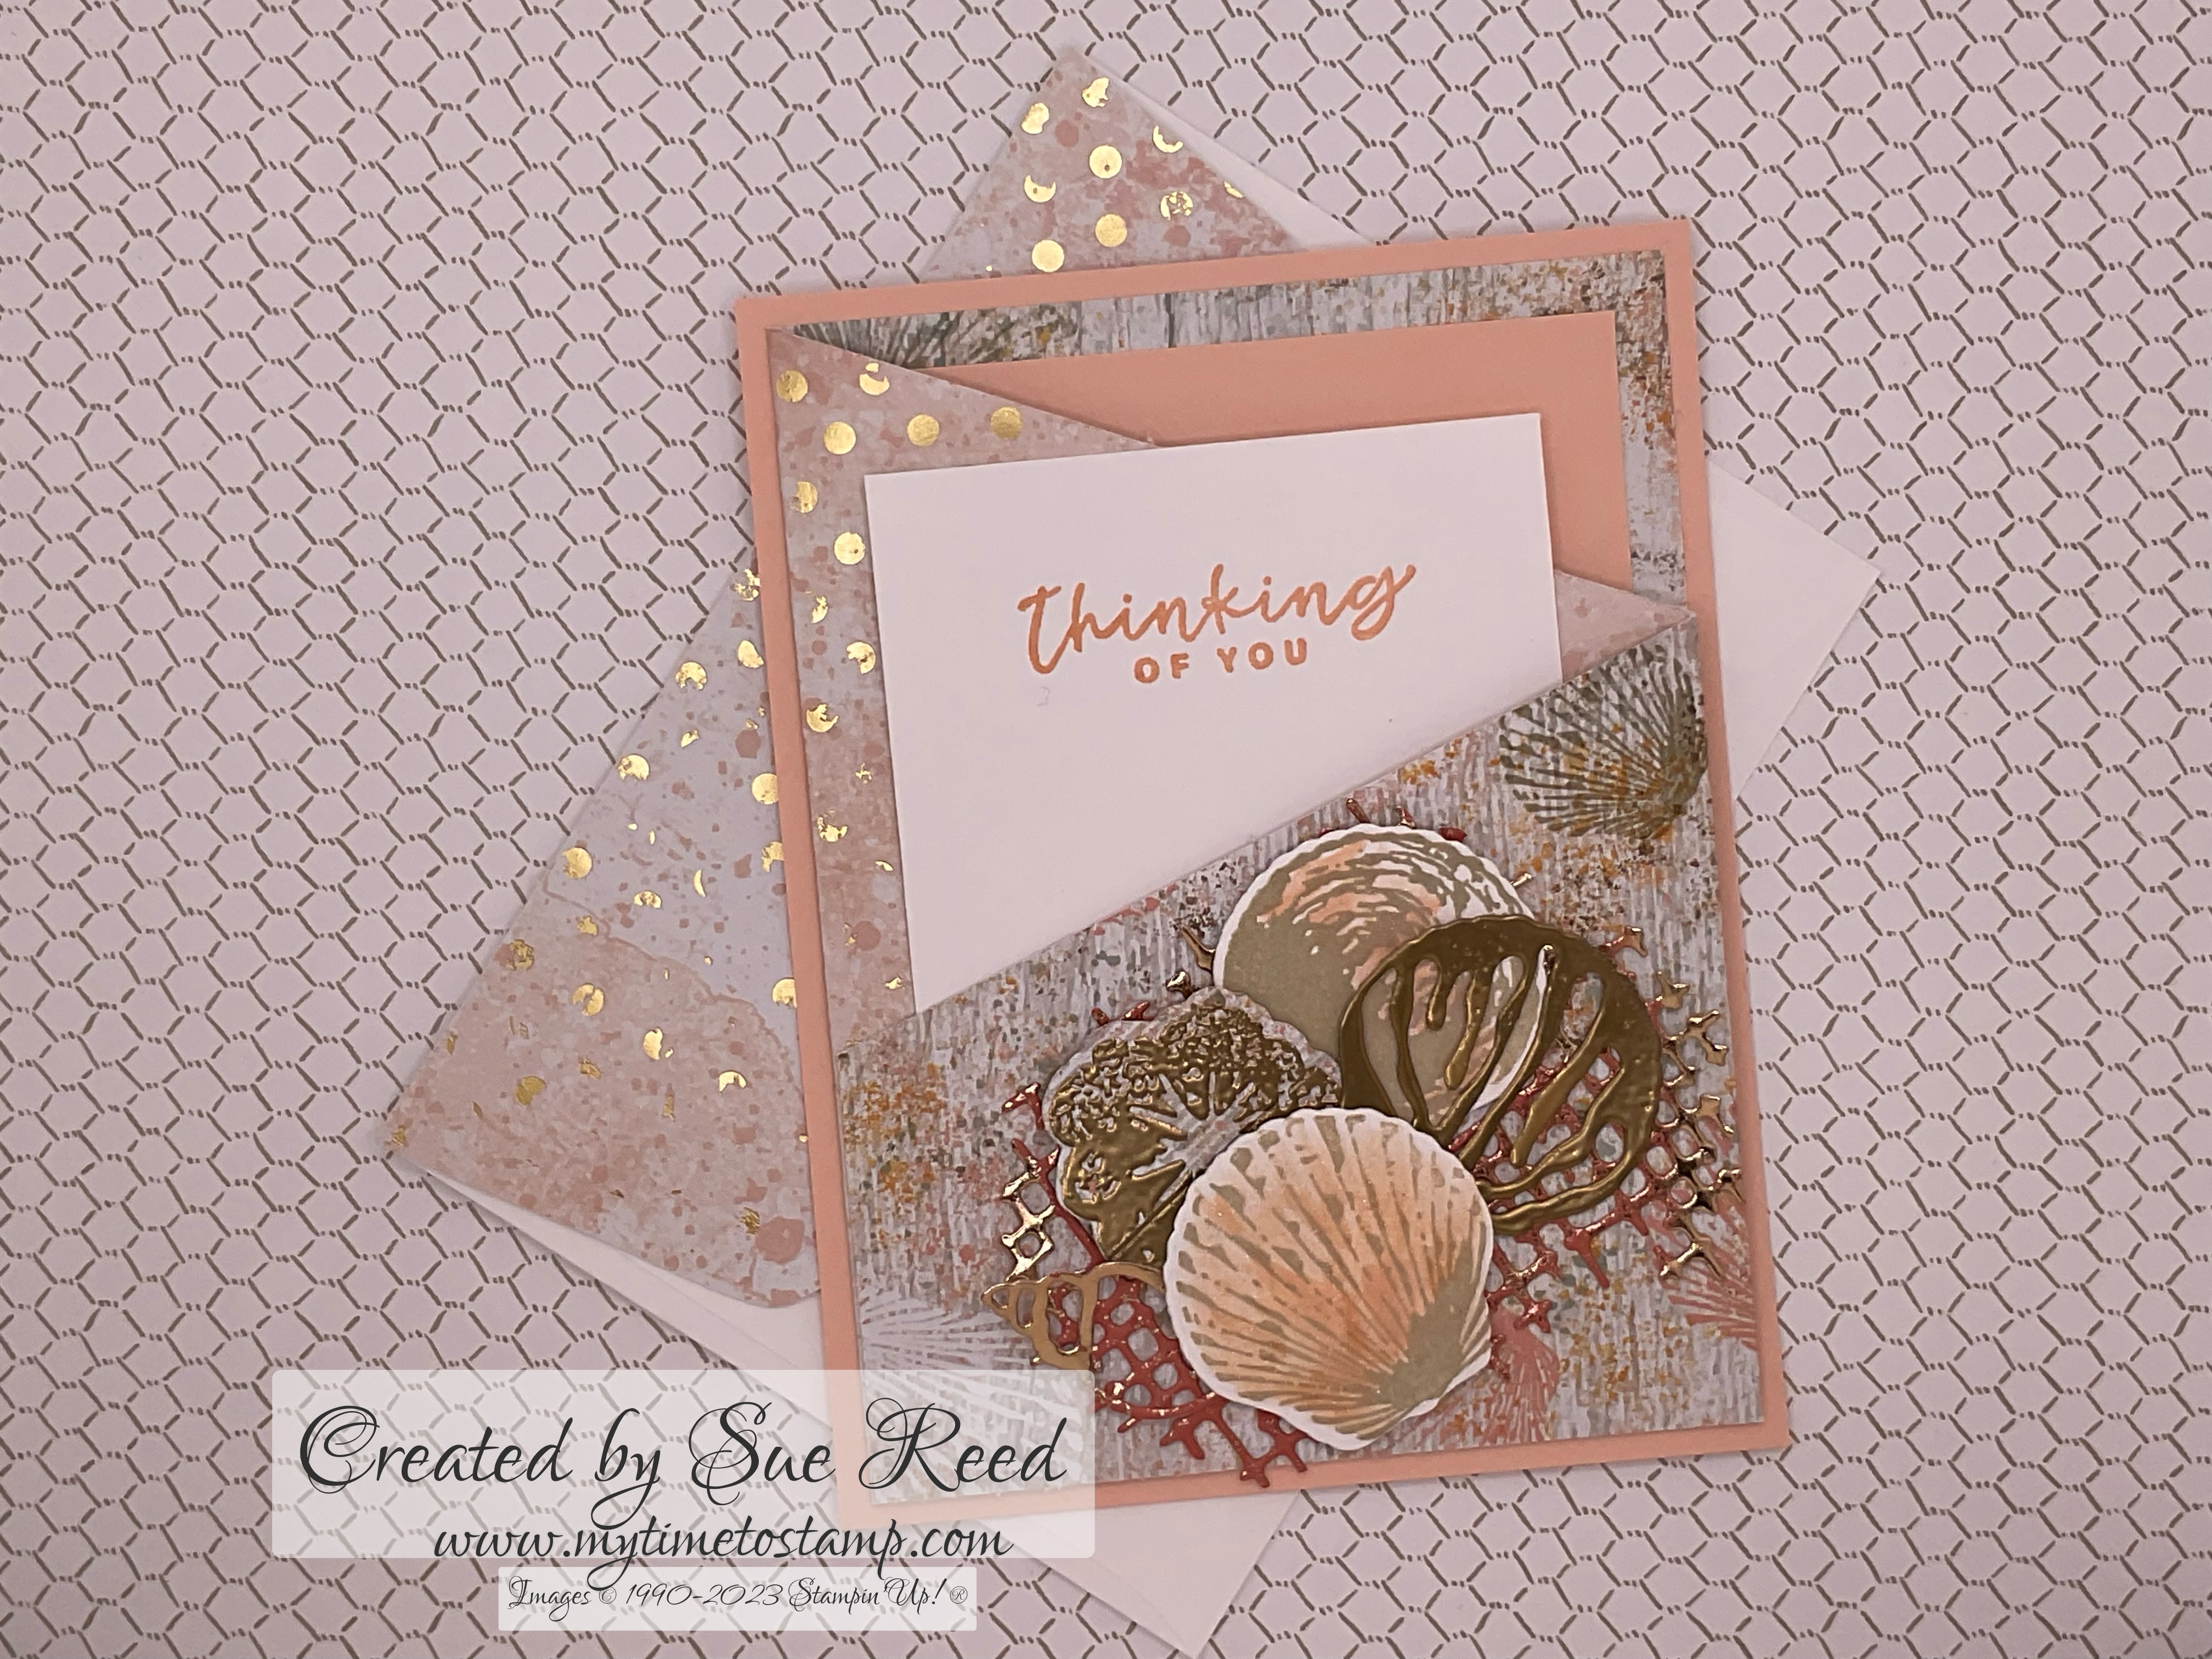
April 2023 Card Layout #3

 April 2023 Card Layout #3
SU’s Season of Chic Bundle and Texture Chic Specialty DSP

A fun fold with a pocket. In early March I posted another version of this card made with SU’s Irresistible Blooms Bundle with two pocket cards. Now I have finally finished this version. On this version there is only one pocket card on the front, and the card opens to an inside panel.


Measurements:
  • Card base 4 1/4” x 5 1/2” cardstock
  • Patterned paper 5 1/4” x 12”; 2 1/2” x 6” for envelope and scraps for flower, shell and netting
  • White cardstock 3” x 4 1/4”; scraps to stamp shells land flower
  • Colored cardstock 3 1/2” x 4 3/4”
Directions:
  • Score patterned paper @ 4” and 8”. Fold on score lines. 
  • Unfold the DSP. Mark up two inches from the bottom of the first section. Cut from top of the second fold across to the mark. The finished cut should look like this:


  • Fold on the score lines for the zig-zag:

  • Add Tear and Tape or a very thin line of liquid glue as shown below:


  • Fold the flap back again to form the front pocket so the white cardstock fits inside:

  • Add the panel to the inside of the card.
  • Stamp shells on white cardstock with Sahara Sand Classic Stampin’ Pad. Die cut. Color shells using ink from Petal Pink Classic Stampin’ Pad and Wink of Stella.
  • Die cut flower and open shell from the DSP and heat emboss with gold embossing poweder.
You can find the SU’s products that you need to make this card in my Online Store

SU Products:
  • Season of Chic Bundle 158816
  • Texture Chic DSP 158808
  • Dry Brushed Metallic Specialty DSP 160837
  • Petal Pink Cardstock 146985
  • Basic White Cardstock 159276
  • Petal Pink 147108 and Sahara Sand 147117 Classic Stampin’ Pad
  • Stampin’ Emboss Powders Metallics 155555
  • VersaMark Ink 102283

April 2023 Card Layout #2

 April 2023 Card Layout #2
SU’s True Beauty Bundle and Awash In Beauty DSP
A fun fold with the gorgeous SU’s Awash In Beauty DSP. 


Measurements:
  • 4 1/4” x 8 1/4” cardstock for base
  • 8 1/2” x 2 3/4” cardstock for second card base
  • DSP or neutral cardstock 3 1/4” x 2 1/2”
  • DSP or embossed cardstock 4” x 5 1/4”
  • DSP 2 1/2” x 4”
  • DSP 5/8” x 4”
  • DSP 2 1/2” x 6” for envelope flap
  • Neutral 3 1/4” x 2 1/2” for inside
  • White Cardstock scraps for stamping the flowers and leaves
Directions:
  • Score base cardstock at 2 3/4”
  • Score cardstock for second card base at 3 1/2” and 2 3/4” and glue the left side together to form book binding card base.
  • Adhere the larger DSP panel to card base on the left side.
  • Adhere DSP to the outside of the right flap on card base.
  • Adhere 5/8” DSP panel to left side of second card base for the book binding.
  • Adhere the 3 1/4” x 2 1/2” DSP or neutral panel to front of second cardstock card base.
  • Add die cuts or shapes or sentiment and embellishments. On a couple of the flowers and the leaves, I stamped off once. I die cut the sprigs out of some of the DSP.
  • Adhere DSP to envelope flap and trim.
Products need to make this card can be found in my Online Store

SU’s products:
  • Awash In Beauty DSP 158973
  • Mossy Meadow Cardstock 133676
  • Basic White Cardstock 159276
  • Calypso Coral 147101, Polished Pink (no longer available), Blackberry Bliss 147092 and Mossy Meadow 147111 Classic Stampin’ Pads


Tuesday, April 4, 2023

April 2023 Card Layout #1

 April 2023 Card Layout #1
SU’s Petal Park and Sentimental Park Bundles and Flowers and More DSP

Really love the Flowers and More DSP. It brightens up this layout!! And SU’s Tahitian Tide In Color is my favorite from the 2022-2024 In Colors!!


The products needed to make this card can be found in my Online Store

Measurements:
  • 5 1/2” x 8 1/2” cardstock, scored at 4 1/4”and folded on the score line.
  • 4” x 5 1/4” cardstock layer
  • 1 3/4” x 5 1/4” patterned paper
  • 3/4” x 5 1/4” patterned paper
  • About 2 1/4” x 3 1/4” for label neutral cardstock
  • White cardstock scraps
Directions:
  • Adhere the cardstock layer to the card front.
  • Adhere the two patterned paper panels to card front.
  • Stamp flowers on white cardstock scraps and punch out. Add to label with dimensionals.
  • Add label to card front with dimensionals.

The products needed to make this card can be found in my Online Store

Stampin’ Up! products used:
  • Flowers and More DSP ( patterned paper) 160802
  • 2022-2023 In Color 6”x6” DSP (patterned paper) 159253
  • Tahitian Tide cardstock 159261
  • Night of Navy cardstock 100867
  • Basic White cardstock 159276
  • Night of Navy Classic Stampin’ Pad 147110
  • Tahitian Tide Stampin’ Blends Combo Pack 159221
  • Enamel Dot Essentials 160751


Wednesday, March 22, 2023

March 2023 Card Layaout # 19

 March 2023 Card Layout #19
SU’s Sentimental Park and Petal Park Bundles. Also the Around the Bend and Radiating Stitches Dies

Another fun fold thanks to Rachel Tessman’s Facebook Live today. 

Products needed to make this card can be found on my Online Store


Measurements:
  • 5 1/2” x 8 1/2” cardstock for card base
  • Cut two white cardstock panels 1 5/8” x 5 3/8”; one rectangle for card front panel smaller than patterned paper panel
  • Patterned paper for front panel rectangle cut slightly larger than the white panel.
  • Cardstock scraps for stamping and die cutting flowers and leaves
Directions:
  • Score card base at 4” from both sides. Then score card base at 2 1/8” from both sides. See the second image above. Trim 1/4” plus a little bit from each end. That will allow the side panels to fold in under the card front panel.
  • Stamp and decorate the inside white cardstock panels and adhere them to the inside panels of the card as in the third image above.
  • Measure or die cut a white panel (used the second largest die from Radiating Stitches die on this card).  Stamp flowers on white cardstock scrap. Then die cut or punch them out and add to this panel. Attach this panel to the patterned paper rectangle.
  • Attached the finished front card panel to the middle (the scored 1/2” panel) of the card base with dimensionals. Then fold the outside panels in under the front card panel. See last image above.
  • Stamp envelope if desired.

Products needed to make this card can be found on my Online Store

Products:
  • Sentimental Park Bundle 160567
  • Petal Park Bundle 160577
  • Around the Bend Dies 160649
  • Country Gingham 6” x 6” DSP 160388
  • Radiating Stitches Dies 161595
  • Balmy Blue Cardstock 146982
  • Basic White Cardstock 159276
  • Mint Macaron Cardstock 146982
  • Petal Pink Cardstock 146985
  • Balmy Blue 147107 and Petal Pink 147108 Classic Stampin’ Pads
  • 2021-2023 In Color Opal Rounds 159185


Monday, March 20, 2023

March 2023 Card Layout #18

March 2023 Card Layout #18
SU’s On The Farm Bundle and Flowers and More DSP

This layout is called a swing window fun fold. So much fun to use the On The Farm Bundle with this DSP.

The products need to make this card can be found in my Online Store


Measurements:
  • 5 1/2” x 8 1/2” cardstock for card base
  • 4 x 5 1/4” cardstock or DSP layer
  • 2 1/2” x 6” DSP for envelope-optional
  • 5 1/4” x 8” cardstock for inside panel and scrap for die cut shape-circle or square
Directions: 
  • Score card base at 4 1/4” and fold on score line.
  • Adhere the cardstock or DSP layer to card front. If you want, you can emboss the cardstock, but be sure to only use glue for the die cut opening before die cutting. Then you can emboss the cardstock and adhere it to the front matching up the opening.
  • On the inside panel, score at 2”, 4” and 6”. Follow the third picture above to see how to adhere the inside panel.
  • Adhere the die cut shape as shown in the second picture.
  • Adhere the optional envelope DSP to envelope flap and trim.
The products need to make this card can be found in my Online Store

Products:

May 2023 Card Layout #2

 May 2023 Card Layout #2 SU’s Irresistible Blooms Bundle and Hello, Irresistible DSP Great layout so show off this DSP. I was lucky to have ...